Building a CLI wordle game in Rust: Part 4
Welcome to part 4 of this Rust tutorial. Last time we insured code integrity by adding unit tests and refactored the code to have a stable foundation to build more features onto. We prepared multi-language support, added fallbacks and vastly improved the sanitization of user input. This time, there’s more action. Our game still needs an import tool and because unit testing is not enough, we’ll add an integration test with an environment based on temporary files as well. The import tool should be able to handle CLI arguments and the dictionary localization is also not finished yet.
Table of Contents
- Prerequisites
- Getting started
- Adding a new binary
- Creating a lib
- Writing with
LineWriter - Temporary files
- Import tool
- Command line arguments
- Integration tests
- Wrapping it up
Prerequisites
This tutorial continues Building a CLI wordle game in Rust: Part 3, so make sure you worked through it beforehand.
Additionally, creating temporary files with UUID naming will be introduced. Open your Cargo.toml and add the new crates shown below.
[package]
name = "fancy-hangman"
version = "0.1.0"
edition = "2021"

[dependencies]
colored = "2"
rand = "0.8.5"
any_ascii = "0.3.1"
sys-locale = "0.2.0"
uuid = { version = "1.1.1", features = ["v4", "fast-rng"] }
clap = { version = "3.1.18", features = ["derive"] }
strum_macros = "0.24.0"
Run cargo build.
clap is a Rust library that allows simple
access to arguments passed by the command line. It also prints pretty usage
messages to the CLI. With strum_macros
we can simply get String representation of our AppLanguage enum variants.
The uuid crate is a library that allows us to generate a unique identifier. But what does that mean?
A UUID is 128 bits long, and can guarantee uniqueness across space and time.
— https://en.wiktionary.org/wiki/Tohuwabohu
Simply said, a UUID consists of multiple hopefully unique parts – for example a
system timestamp, a MAC address – stitched together into a hexadecimal
representation. They are separated into 5 groups by a - character, represented
in lower case and 36 characters long, including the dashes. An example UUID is
shown below.
3e763cfd-eab3-40b1-99bc-517f5a465a53
The performance of UUID creation is considered controversial. But when it comes to generating temporary files, using a UUID to serve as file or directory name is usually a safe form to avoid naming conflicts in the temporary folder of the operating system. Because we will create exactly one file, performance can be neglected.
Getting started
Over the new few minutes, we will
- Add a new binary
- Write to a local file
- Read command line arguments
- Write an integration test
Adding a new binary
Until now, the project consists of one binary only: main.rs. Rust binaries are
programs than can be executed because they have a main function. In Rust, it’s
possible for a crate to contain multiple binaries. In order to do so, the
recommended project layout suggests putting additional binaries into the
src/bin folder.
Create that folder and put a new file named import.rs into it, resulting in
the following structure. Also, implement an empty main function.
fancy-hangman
|- Cargo.toml
|- bin
  |- src
    |- import.rs
|- res
  |- dictionary.txt
|- src
  |- dictionary.rs
  |- main.rs
  |- text
    |- mod.rs
    |- text_dictionary.rs
Execute cargo run in the terminal.

Cargo automatically discovers binaries in the src/bin directory, but does not
choose between them. But you can by specifying it in the CLI with the commands
cargo run --bin fancy-hangman and cargo run --bin import.
Alternatively, we can tell Cargo what binary to consider as default when
executing by editing Cargo.toml.
[package]
name = "fancy-hangman"
version = "0.1.0"
edition = "2021"
default-run = "game"

[[bin]]
name = "game"
path = "src/main.rs"


[[bin]]
name = "import"
path = "src/bin/import.rs"

[dependencies]
colored = "2"
rand = "0.8.5"
any_ascii = "0.3.1"
sys-locale = "0.2.0"
uuid = { version = "1.1.1", features = ["v4", "fast-rng"] }
clap = { version = "3.1.18", features = ["derive"] }
As you can see, the Rust binaries need to be declared in a
target table.
By using [[bin]] sections the paths for the binaries named game and import
will be set. Additionally, I declared game to be the default-run binary so
the code in main.rs will be executed by default. Give it a try!
Creating a lib
It’s considered best practice to declare a lib when you have multiple Rust
binaries sharing code. This way, the compiler will compile the modules only
once. Create a file named lib.rs on the same level as main.rs to make the
project structure look like this.
fancy-hangman
|- Cargo.toml
|- bin
  |- src
    |- import.rs
|- res
  |- dictionary.txt
|- src
  |- dictionary.rs
  |- lib.rs
  |- main.rs
  |- text
    |- mod.rs
    |- text_dictionary.rs
Put nothing but the module declarations into the file. You’ll need to change the
modifier to pub.
pub mod dictionary;
pub mod text;
pub mod lang;
After that, update the existing imports in main.rs.
use fancy_hangman::lang::locale::{AppLanguage, get_app_language, replace_unicode};
use fancy_hangman::text::text_dictionary::TextDictionary;
use fancy_hangman::dictionary::Dictionary;
Run cargo build afterwards, there should not be any compilation errors. Maybe
also try cargo test.
Writing with LineWriter
Prepare a new method write_word in Dictionary and implement it in
TextDictionary.
/// Provides basic functions for reading and writing from and to a dictionary
pub trait Dictionary {
    fn get_random_word(&self) -> Option<DictionaryEntry>;
    fn find_word(&self, text: &str) -> Option<DictionaryEntry>;
    fn create_word(&self, word_entry: DictionaryEntry);
}
The implementation shouldn’t be too hard.
In Part 2 we read from a file the first time,
this one we will write into it. Preventing duplicates from being inserted is
easy, we’ll just invoke the find_word method that looks into the dictionary
and tells us if it found anything. Then, use a match construct to process the
returned Option.
Open the local file set at &self.Dictionary_file_path, create a
std::io::LineWriter
from the file and invoke the write method with the String slice. The method
should append words to the existing file. To achieve that, std::fs::File does
not provide enough options.
std::fs::OpenOptions
on the other hand allows it.
use std::fs::{File, OpenOptions};

// ...

impl Dictionary for TextDictionary {
    // ...

    fn create_word(&self, word_entry: WordEntry) {
        match self.find_word(&word_entry.word) {
            Some(_) => println!("'{}' already exists in the Dictionary.",
                &word_entry.word),
            None => {
                let file_result = OpenOptions::new()
                    .append(true)
                    .open(&self.Dictionary_file_path);

                match file_result {
                    Ok(file) => {
                        let mut writer: LineWriter<File>
                            = LineWriter::new(file);
                        writer.write(&word_entry.word.as_ref()).unwrap();
                        writer.write(b"\n").unwrap();

                        println!("Added '{}' to the Dictionary!",
                            &word_entry.word)
                    }
                    Err(e) => println!("Error when writing '{}' to the Dictionary:\n{}", &word_entry.word, e)
                };

            }
        };
    }
}
Open src/import.rs and add a few imports that we’ll need.
use fancy_hangman::lang::locale::{AppLanguage, replace_unicode, get_app_language, parse_app_language};
use fancy_hangman::text::text_dictionary::TextDictionary;
use fancy_hangman::dictionary::{Dictionary, DictionaryEntry};
Temporary files
Now that we have everything necessary accessible in the additional binary, it’s
time to start coding. The tool is required to read an input file, toss out any
words that are duplicates or not of 5 characters length, sanitize each word and
put it into the dictionary. More specifically, for now the tool will work with
the TextDictionary exclusively simply because there is no other yet.
Implement 2 functions (apart from main): polish and import. polish will
read from a source_path and sanitize input coming from the file AppLanguage
in mind and then write to a temporary file and result the file path afterwards.
In order to do so, get the system’s temporary file path by calling the
std::env::temp_dir
function. The path depends on the underlying operating system. For Linux and
MacOS it should be /tmp; for Windows it usually in the %userprofile%
directory somewhere in AppData or maybe in %systemdrive%.
use std::env::temp_dir;
use uuid::Uuid;

/// Read raw word list from source_path and polish with matching app_language
/// strategy.
/// Words of more than 5 characters of size get discarded.
/// The polished list is then written to a temporary file located in the tmp
/// directory of the filesystem.
///
/// See [temp_dir] documentation for more information.
///
/// # Arguments
///
/// * `src_path` - A string slice that holds the path of the file you want to
/// import on the filesystem
/// * `app_language` - The language of the imported words. See [AppLanguage]
fn polish(
    source_path: &str,
    app_language: AppLanguage
) -> Result<String, Error> {
    let tmp_file_name = format!("{}/{}.txt",
        temp_dir().to_str().unwrap(), Uuid::new_v4());

    let out_file: Result<File, Error> = File::create(&tmp_file_name);

    // ...
}
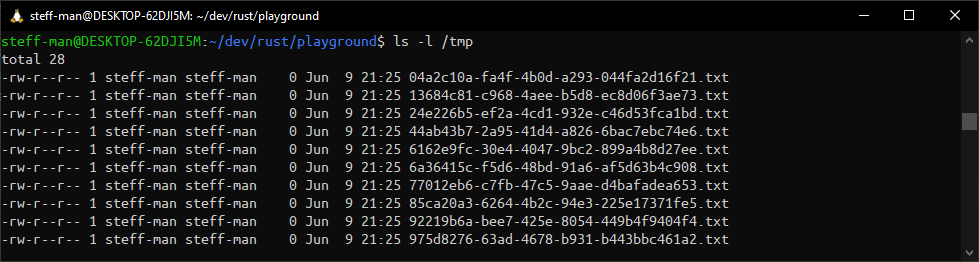
The file name itself will be created with a UUID like I mentioned in the
beginning. The syntax here seems a little weird, but that’s just how
std::path::PathBuf
works. If you call this function right now with dummy parameter values – e.g.
polish("foo", AppLanguage::EN), you can see that there are new files created
on your system’s temporary folder.
Process out_file with an exhaustive match construct. You can just pass the
error through, but in the Ok arm there should be a few things happening.
Thanks to our unit tests, we can assume that our string sanitization process
works for any String input. So, why not reuse the code? We just need to read
from the file underneath source_path, sanitize the lines with
replace_unicode, check if their length equals 5 and write them into the
temporary file. I like to add dots to the console so the user knows that there’s
still something happening.
Ok(out_file) => {
    let buf_reader = BufReader::new(File::open(source_path).unwrap());
    let mut writer: LineWriter<File> = LineWriter::new(out_file);

    println!("processing file {}", source_path);

    for line_result in buf_reader.lines() {
        let polished = replace_unicode(line_result.unwrap().as_str(),
            app_language);

        if polished.len() == 5 {
            print!(".");

            writer.write(polished.as_ref())?;
            writer.write(b"\n")?;
        }
    }

    println!("finished polishing");

    Ok(tmp_file_name)
}
Provide a source file. It can be anywhere on the file system, but to make
testing easier, put it into the res folder. For example, you could create a
res/source_file.txt with a few entries:
lusty
mushy
skiing
trying
flying
sigh
sight
sights
right
rights
might
height
Obviously not all of them are suitable for validation because of their different length that should be 5 characters. But that’s part of the test. I expect that only 5 words from that list suit our needs.
Call polish from the main function. Don’t forget to get the system locale like we did in Part 3.
fn main() -> std::io::Result<()> {
    polish("res/source_file.txt", get_app_language())?;

    Ok(())
}
Error handling might look sleazy, but think about the purpose of this tool. It does not run in any loop that requires user input. It has exactly one task: To read and write from a file. If anything fails, there simply wouldn’t be any need to handle errors.
Now, give it a try. Execute cargo run --bin import and see what happens!

At the first look I see 5 dots and that’s a good sign. We can validate the assumption by looking into the generated file.

Import tool
Now, the second function import should read the temporary file, create a
WordEntry and put it into the Dictionary. The TextDictionary handles the
i/o of its file when create_word has been invoked, which implicitly invokes
find_word to avoid inserting duplicates. After that, a counter is returned to
the main function to indicate how many words have been imported.
/// Import temporary file created by [polish] into the dictionary.
/// Avoid duplicates when inserting a [DictionaryEntry] into the dictionary.
///
/// # Arguments
///
/// * `tmp_file_name` - A String that holds the name of the temp file created
fn import(tmp_file_name: String) -> Result<i32, Error> {
    let dictionary = TextDictionary::new(String::from("res/dictionary.txt"));
    let buf_reader = BufReader::new(File::open(tmp_file_name).unwrap());

    println!("Importing...");

    let mut counter = 0;
    for line_result in buf_reader.lines() {
        let line = line_result.unwrap();

        dictionary.create_word(WordEntry { word: line });

        counter += 1;
    }

    Ok(counter)
}
Connect the dots in the main function.
fn main() -> std::io::Result<()> {
    let source_file = polish("res/source_file.txt", get_app_language())?;
    let counter = import(source_file)?;

    println!("Added {} words to the dictionary!", counter);

    Ok(())
}
Time to go live. Given our existing dictionary, I expect one duplicate that won’t be added. So the temporary file should contain 5 words and the dictionary should be extended by 4 words.
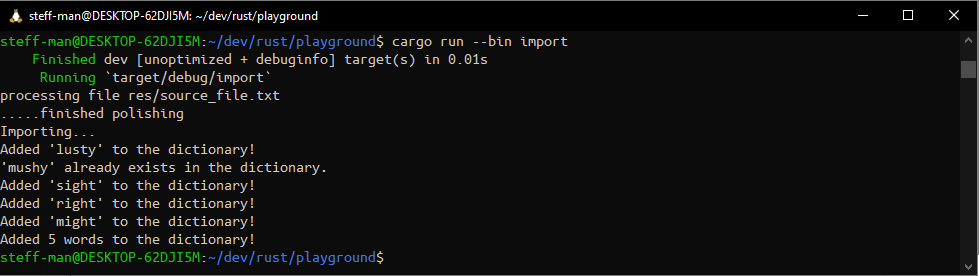
And that’s it! The dictionary now contains more words.
Command line arguments
The source_file parameter for polish really shouldn’t be hardcoded. Maybe
the import tool is used to update a dictionary for another language, so it would
be wise to not always take the locale of the system settings but make it an
optional argument. To fully provide internationalization, the dictionary files
should be split up into dictionary_ {$language}.txt. Thankfully, those things
are not very complicated to accomplish thanks to our solid foundation. Feel free
to pat yourself on the shoulder and thank the Rust library crates.
We added the clap crate before. In Rust, you usually can get the arguments passed with std::env::args(), but the language should be an optional parameter defaulting to the system settings if unset and that’s too much of a hassle to handle. Also, formatting useful help or error messages is exhausting to do manually. The library allows us to declare arguments and get useful messages in a very convenient way.
use clap::Parser;

#[derive(Parser)]
struct Arguments {
    source_file: String,
    language: Option<String>,
}

fn main() -> std::io::Result<()> {
    let args = Arguments::parse();
    // ...
}
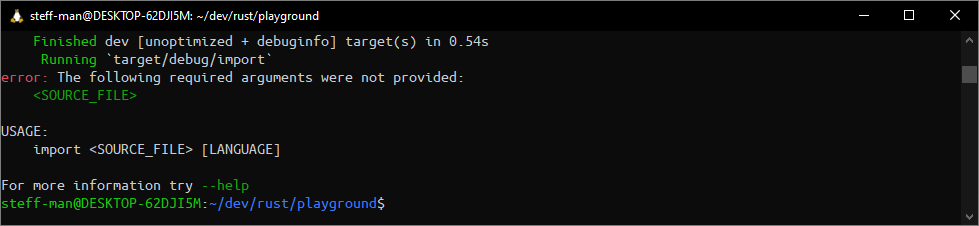
That’s it. We’re as good as finished. If you don’t believe me, execute
cargo run --bin import in the CLI.
After some adjustments the main function should look like this.
use fancy_hangman::lang::locale::{AppLanguage, replace_unicode, get_app_language, parse_app_language};

// ...

fn main() -> std::io::Result<()> {
    let args = Arguments::parse();

    let app_language = match args.language {
        None => get_app_language(),
        Some(flag) => parse_app_language(flag.as_str())
    };

    let source_file = polish(&args.source_file, app_language)?;
    let counter = import(source_file)?;

    println!("Added {} words to the dictionary!", counter);

    Ok(())
}
Now that we can take a language argument, the file name should be adjusted
properly. The simplest way would be taking advantage of the AppLanguage enum
variants. But the problem is that in Rust there is no such thing as a String
enum. We’d have to implement the
std::fmt::Display trait
or maybe switch to a Map structure. Thankfully, there’s a crate that makes it
possible for us to simply get a String representation out of an enum variant:
strum_macros. Open locale.rs and change it like this.
#[derive(Clone, Copy, Debug, PartialEq)]
#[derive(strum_macros::Display)]
pub enum AppLanguage {
    DE,
    EN
}
Add a app_language parameter to the import function. You can adapt the
dictionary declaration line to use the format! macro.
let dictionary = TextDictionary::new(
    String::from(
        format!("res/dictionary_{}.txt",
            app_language.to_string().to_lowercase())
    )
);
When you run the importer now, you most likely receive an error because the file
we’re trying to write into does not exist. Indeed, the OpenOptions call in
TextDictionary need to be changed by calling the create function. This way,
nonexistent files will be created automatically but existing files will be
appended.
let file_result = OpenOptions::new()
   .create(true)
   .append(true)
   .open(&self.dictionary_file_path);
Try starting the importer with cargo run --bin import now. Remember: The
create_word function implicitly calls the find_word function.
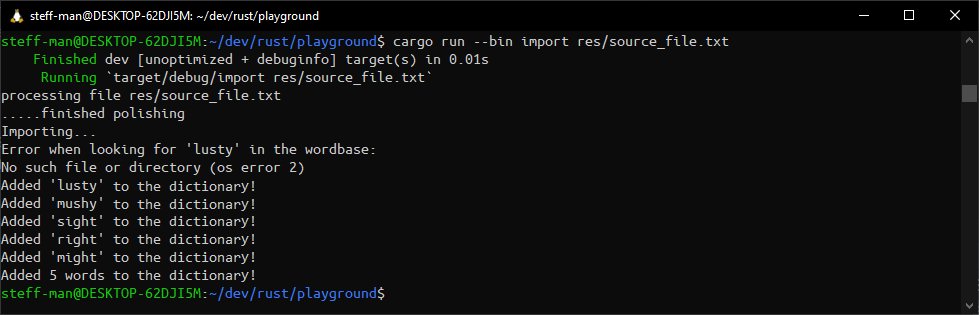
That one error does not really matter. It gets caught in the right match arm
so the program does not stop. It just happens to be that find_word tries
looking into a nonexistent file at the first entry. Just make sure everything is
created as expected.

Integration tests
Now that the TextDictionary implementation holds a lot of responsibility for
the application, it makes sense to cover its functions with integration tests.
In the previous part we covered unit tests. There is a difference between those
terms. The latter covers testing the smallest possible part of your code,
including private functions, the former requires us to test bigger chunks, e.g.
libraries that are publicly accessible.
Now that we created a library before and due to the fact that the module
text_dictionary is part of multiple Rust binaries, the functionality should be
tested as a whole. That should be no problem now that we are fond of temporary
files. For the lang module there’s not much to do. Nothing, to be precise, as
everything is so granular that it is covered by unit tests. In my opinion it’s
best practice when unit tests and integration tests are kept separated.
Start by creating a new folder tests in the root directory of the project.
That folder will be detected automatically and not be part of cargo build, only
cargo test. Yet again, behold the new project structure and open
text_dictionary_test.rs.
fancy-hangman
|- Cargo.toml
|- bin
  |- src
    |- import.rs
|- res
  |- dictionary.txt
|- src
  |- lib.rs
  |- main.rs
  |- dictionary.rs
  |- text
    |- mod.rs
    |- text_dictionary.rs
|- tests
  |- text_dictionary_test.rs
I like to start by defining a toolset. In this case each test works isolated and needs its own environment. That means, a temp file is created when the test starts, processed and destroyed afterwards. Keep it simple here.
use fancy_hangman::text::text_dictionary::TextDictionary;
use fancy_hangman::dictionary::{Dictionary, DictionaryEntry};

mod tools {
    use std::env::temp_dir;
    use std::fs::{File, OpenOptions, remove_file};
    use std::io::Write;
    use uuid::Uuid;

    pub fn setup() -> String {
        let tmp_file_name = format!("{}/{}.txt",
            temp_dir().to_str().unwrap(), Uuid::new_v4());

        File::create(&tmp_file_name).unwrap();

        tmp_file_name
    }

    pub fn fill(file_path: &String, sample_words: Vec<&str>) {
        let file_result =  OpenOptions::new()
            .append(true)
            .open(file_path);

        match file_result {
            Ok(mut file) => {
                for word in sample_words {
                    file.write(word.as_ref()).unwrap();
                    file.write(b"\n").unwrap();
                }
            }
            Err(e) => panic!("Error setting up integration test:\n{}", e)
        };
    }

    pub fn get_sample_words() -> Vec<&'static str> {
        vec!["rusty", "fishy", "busty", "lusty"]
    }

    pub fn teardown(file_path: String) {
        remove_file(file_path).unwrap();
    }
}
There is nothing new in this code snipped apart from the std::vec::Vec initialization with the vec! macro owning ‘static lifetime. That sounds intimidating at first, but means nothing more than creating an immutable array of immutable string slices. To make it even an inch less intimidating, it’s our five test words that won’t change.
The first test will cover creating a word. That means, writing to a temporary
file without any error. Remember that find_word is implicitly called and
nothing is to be returned. The test fails when the method
panics.
#[test]
fn test_create_word() {
    let file_path = setup();

    let dictionary = TextDictionary::new(file_path.clone());

    dictionary.create_word(DictionaryEntry{ word: String::from("rusty") });

    teardown(file_path);
}
The second test will cover finding a word in the dictionary. Therefore, the sample test data is loaded into the dictionary, and it’s expected that each word loaded will be found and that the internal matching works.
#[test]
fn test_find_word() {
    let file_path = setup();
    fill(&file_path, get_sample_words());

    let dictionary = TextDictionary::new(file_path.clone());

    for word_str in get_sample_words() {
        match dictionary.find_word(word_str) {
            Some(word) => assert_eq!(word_str, word.word),
            None => assert!(false)
        }
    }

    teardown(file_path);
}
The third test inverts the second: No test data is loaded, and it’s expected
that all match arms assert to None.
#[test]
fn test_find_word_negative() {
    let file_path = setup();

    let dictionary = TextDictionary::new(file_path.clone());

    for word_str in get_sample_words() {
        match dictionary.find_word(word_str) {
            Some(_) => assert!(false),
            None => assert!(true)
        }
    }

    teardown(file_path);
}
The fourth test is similar to the second and will read just one random word. The word read must match one of the words in the test data.
#[test]
fn test_read_random_word() {
    let file_path = setup();

    fill(&file_path, get_sample_words());

    let dictionary = TextDictionary::new(file_path.clone());

    match dictionary.get_random_word() {
        Some(word) =>
            assert!(get_sample_words().contains(&word.word.as_str())),
        None => assert!(false)
    }

    teardown(file_path);
}
The fifth and final test inverts the fourth and expects no random word from an empty dictionary to be read.
#[test]
fn test_read_random_word_negative() {
    let file_path = setup();

    let dictionary = TextDictionary::new(file_path.clone());

    match dictionary.get_random_word() {
        Some(_) => assert!(false),
        None => assert!(true)
    }

    teardown(file_path);
}
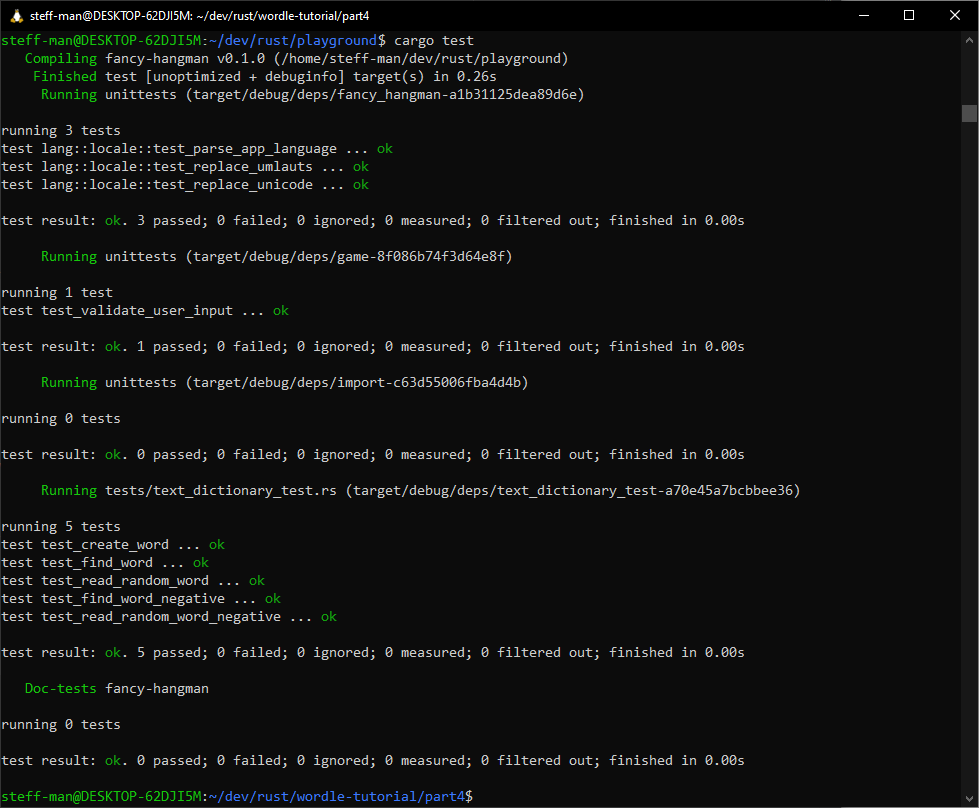
Time to run cargo --test.
I think it could also be useful to implement integration tests for import.rs
as well. It’s not a library, but a very important tool with limited
functionality that should always work as expected. The setup for the tests could
look similar to text_dictionary_test.rs, maybe pulling out the tools module to
provide a testing suite across all integration tests. But I’ll leave that to
you, feel free to try, I hope you understood my point.
Wrapping it up
I admit this part was a little longer than I anticipated, so congratulations making it to the end oft part 4 of this Rust tutorial. Last time I promised more action and I hope you had fun trying all this stuff. Take some time and revisit previous parts. Compared to Building a CLI wordle game in Rust: Part 1 there’s definitely some progress that happened.
In the next part I will cover database access. Stay tuned.
You can find the code at this stage on my github page.
Building a CLI wordle game in Rust: Part 3