Building a CLI wordle game in Rust: Part 1
Coming from the Web Development world that mostly consists of high-level languages like Java and JavaScript, I decided to peek into a new language this year and chose Rust. Because, I thought, why not. You learn the most when actually doing stuff instead of just reading books and articles and after wasting many hours and days playing a certain popular word guessing game, I concluded that this would be a neat first project to accomplish.
My interlude with low-level languages like C was long ago. I remember doing many things wrong and ultimately being frustrated with nondescript compiler error messages, dismissive about learning concepts like memory management, pointers, adresses and allocation. Java is a much more forgiving language, but the forgiveness comes with a price; you quickly forget about this boring memory stuff thanks to the garbage collector.
So the experience of switching from Java to Rust was just like moving out and living on your own for the first time. Suddenly you have to take care of certain things others did for you. I wish I had listened to my parents more.
Table of Contents
- Prerequisites
- Getting started
- Handling User Input
- Put some color on it
- The fuzz about
Option<?>andmatch - Wrapping it up
Prerequisites
I develop my applications on the WSL2.0 and use my trusty IntellIJ Ultimate Edition as IDE of my choice. If you’re on Windows as well, I heavily recommend the WSL for its convenience. Kudos to Linux and MacOS users.
Follow the setup as described on the
getting started page. Use
cargo --version to verify your installation is working, and we’re good to go.
For this tutorial I use version 1.57.0.

When it comes to wordle, I always thought it was just a fancy type of hangman.
Create a project via cargo new fancy-hangman. You now have the following
structure.
fancy-hangman
|- Cargo.toml
|- src
  |- main.rs
Later on, we’ll need the Rust community crate
colored. Open your Cargo.toml and add it
as dependency.
[package]
name = "fancy-hangman"
version = "0.1.0"
edition = "2021"

# See more keys and their definitions at
# https://doc.rust-lang.org/cargo/reference/manifest.html

[dependencies]
colored = "2"
Open main.rs in the IDE of your choice.
Getting started
Over the next few minutes we will
- React to user inputs via
stdin - Learn about
Option<?>andmatch
Handling User Input
For our use case, reading user input from the CLI is straight-forward because we
read it line wise. The user is expected to insert a word and hit the enter key.
That allows us to use the read_line(&mut: String) function to receive his
input.
So the first working attempt might look like this. We create input: String to
serve as buffer. read_line puts the user input into the buffer and we print it
back into the console with the println! macro.
use std::io::stdin;

fn main() {
    let mut input: String = String::new();

    loop {
        stdin().read_line(&mut input).unwrap();

        println!("User input: {}", &input);
    }
}
Build the project with cargo build and run it with cargo run to give it a
try.
Coming from Java, there are a few things to consider in these few lines.
In Java each variable created is mutable by default and you need to use the
final keyword to make something immutable. In Rust, it’s the opposite and I
recommend consulting the documentation for the implications of mut and &mut.
Also, the question of ownership is different.
Reading user input usually implies some sort of polishing and validation. The
String printed in the console still consists of the newline characters, the
user could accidentally hit the space button before or after his input and there
could be special characters present.
For better readability, those checks should be encapsulated into a validation
function that returns a bool and a read_input function that returns the
valid String to the main function.
use std::io::stdin;

fn main() {
    read_input(5);
}

fn read_input(word_len: usize) -> String {
    let mut input: String = String::new();

    loop {
        stdin().read_line(&mut input).unwrap();
        let polished = input.trim();

        if !validate_user_input(polished, word_len) {
            println!(
                "Invalid input: Your guess must have a size of {} characters. You entered {} characters.",
                word_len, polished.len()
            );

            input.clear();
        } else {
            input = polished.to_lowercase();

            break;
        }
    }

    input
}

fn validate_user_input(user_input: &str, expected_len: usize) -> bool {
    user_input.len() == expected_len
}
The goal is to guess a word that is 5 characters long, so the user input should match this length. The input is trimmed to remove any mishaps and newline characters. Also, we now have a condition that breaks the input loop for the program to terminate.
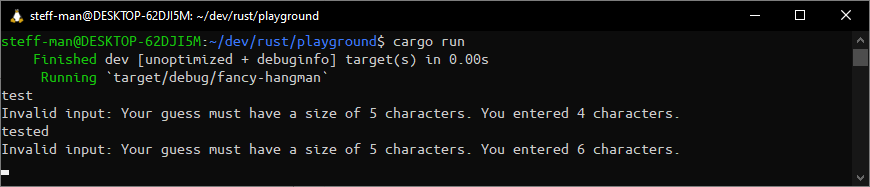
What’s missing now is actually doing anything with the user input. The condition to win this game is to correctly guess a word after a maximum of 6 attempts. Invalid input should not count towards the attempts. In the end, the program terminates due to two conditions: Either the player runs out of attempts or he had guessed the word correctly.
Start by hardcoding a word with five letters of your choice but please refrain
from any obscenities. In the end, the main function should look similar to
this.
fn main() {
    let solution: String = String::from("gusty");
    let max_attempts = 6;

    let mut full_match: bool = false;

    let mut counter = 0;
    while counter < max_attempts {
        let attempt: String = read_input(5);

        let guesses = max_attempts - counter - 1;

        full_match = solution.eq(&attempt);

        if full_match == true {
            break;
        } else {
            if guesses > 1 {
                println!("You now have {} guesses.", guesses);
            } else {
                println!("This is your last guess.");
            }
        }

        if guesses == 0 { println!("Better luck next time!") }

        counter += 1;
    }

    if full_match == true {
        println!("Congratulations! You won!");
    }
}
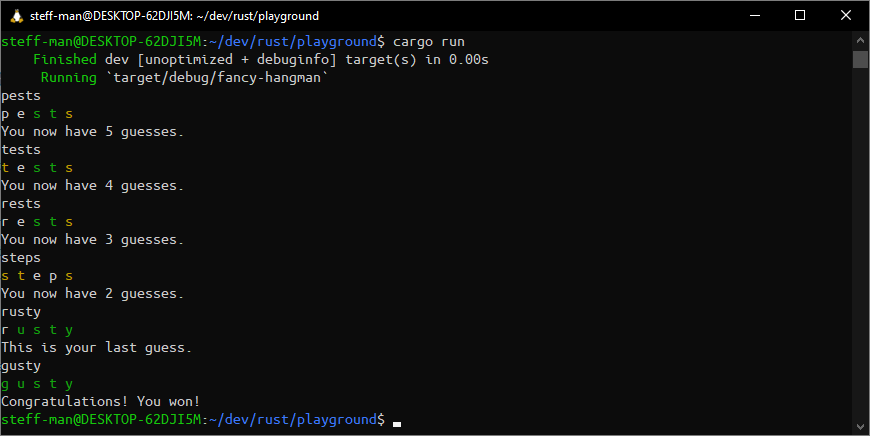
The program terminates on multiple conditions now. Through the counter implementation, the loop will run until a valid input has been issued six times. A full match instantly breaks the loop and congratulates the player on his achievement.
For fairness, the CLI should indicate if any characters entered are part of the solution. The original game does this by coloring letters. We don’t need a fancy web application to do so ourselves.
Put some color on it
The simplest approach is replacing the hard eq match with a new function
check_word. This function should simply iterate over both words. Both
implicitly have the same length and due to the game’s rules checking if a letter
is at the right position can be easily achieved by just comparing the respective
indices. Only one loop is needed.
After that, the hard eq comparison is performed. After the user only won if
this condition is fulfilled. The comparison will be performed after the coloring
to give the player the satisfaction of a fully green colored word.
We added the colored crate to the Cargo.toml in the prerequisite section. It
allows us to call a function color on a String to, as the name suggests, put
Color on it. When iterating over the characters, calling the print! macro (not
the println! macro) will write the colored text to the CLI. char can be
converted to String by calling the to_string() function.
use colored::*;

fn main() {
   // ...
   full_match = check_word(&solution, &attempt);
   // ...
}

// ...
fn check_word(solution_word: &str, guessed_word: &str) -> bool {
    let guessed_characters: Vec<char> = guessed_word.chars().collect();
    let solution_characters: Vec<char> = solution_word.chars().collect();

    for i in 0..guessed_word.len() {
        let index: Option<usize> = solution_word.find(guessed_characters[i]);

        match index {
            Some(_index) => {
                if solution_characters[i] == guessed_characters[i] {
                    print!("{} ",
                        guessed_characters[i].to_string().color("green"))
                } else {
                    print!("{} ",
                        guessed_characters[i].to_string().color("yellow"))
                }
            }
            None => { print!("{} ", guessed_characters[i]) }
        }
    }

    println!();

    // check for full match
    if String::from(solution_word).to_lowercase().eq(guessed_word) {
        return true;
    }

    false
}
Time to test! Run cargo run in the terminal.
The fuzz about Option<?> and match
In the code above Option and match have been introduced. This is because the
find method does not return an index directly, but rather a value wrapped in
an Option<usize>. Other programming languages return a negative index
indicating that the desired character is not part of a String. Rust returns
Some(usize) if the character is present and None otherwise.
An Option needs to be processed by an exhaustive match control flow construct. That may sound threatening at first, but makes sense and becomes easier to wrap your head around the longer you think about it. Each case needs to be taken care of. The example above is trivial because we only care about the presence rather than the value.
Wrapping it up
Congratulations! That’s it for the first part. We did everything on the checklist to implement a simple wordle like game that runs in the CLI. I assume hardcoding the solution just to guess it afterwards goes stale after a few seconds so be sure to don’t miss the second part where we add an external dictionary and rework how the attempts count for better player experience.
You can find the code at this stage on my github page.
Java Projects in WSL and IntelliJ: The Pitfalls