
Building a CLI wordle game in Rust: Part 6
Welcome to the sixth and last part of this Rust tutorial. I hope you enjoyed the ride so far, because now it’s coming to an end. In Building a CLI wordle game in Rust: Part 5 we nearly finished everything. The game can now use a sqlite database as dictionary. That allows us to implement more features. However, those are not fully implemented yet.
The “word of the day” should only be guessed once and marked as guessed
afterwards. That means issuing an UPDATE statement on the selected row. When
starting the game, we will congratulate the player for his achievement and hint
towards visiting the game again tomorrow.
Also, the import tool severely lacks eye-candy. Thankfully, there are Rust community crates to help us make it more beautiful.
Table of Contents
Getting started
Over the next few minutes, we will
- Add progress bars
- Fully complete the game logic
Making it pretty
Let’s start with the fun and colorful stuff first. Because we replaced the
colored crate with console, the build will complain about missing dependencies
and functions that can’t be found. Remove the line use colored::*; and scroll
down to the check_word function.
Some(_index) => {
    if solution_characters[i] == guessed_characters[i] {
        print!("{} ", guessed_characters[i].to_string().color("green"))
    } else {
        print!("{} ", guessed_characters[i].to_string().color("yellow"))
    }
}
Those lines need to be replaced. According to the
console documentation, we achieve
this with the style function.
Some(_index) => {
    if solution_characters[i] == guessed_characters[i] {
        print!("{} ", style(guessed_characters[i].to_string()).green())
    } else {
        print!("{} ", style(guessed_characters[i].to_string()).yellow())
    }
}
Now, run cargo build. Start the game and look if the colors suit you. When
you’re finished, open import.rs.
I’ll try to aim for the yarnish example from indicatifs github page. We will
have 2 indicators that are always shown that represent the steps that need to be
done. In the end, a line is shown displaying a sparkling “finished” message.
I’ll leave it up to you what symbols you want to display here. You can find and
search for Emojis in the Emojipedia.
I chose the bookmark 🔖 for polishing, a minidisc 💽 for indicating the import and leave the sparkle ✨ to be displayed in the end. Define them statically in the code like this:
static BOOKMARK: Emoji<'_, '_> = Emoji("🔖 ", "+");
The second parameter for Emoji is a fallback character in case of the CLI not being able to display those characters.
Because we can’t tell the size of the list we will import beforehand, a spinner
should indicate the polishing process. polish should also count the processed
lines while working. With that additional information, we then know how many
lines import has to process and thus are able to render a real progress bar.
Go to the polish function and implement a counter variable. It should
increment after writing a line. Change the return value to return a
Tuple
wrapped in the Result and return counter in addition to tmp_file_name.
fn polish(
    source_path: &str,
    app_language: AppLanguage
) -> Result<(String, u64), Error> {
    // ...
    Ok((tmp_file_name, counter))
    // ...
}
Change the polish call in the main function. Use the Tuple to set the usual
parameters for import.
let meta_data: (String, u64) = polish(&args.source_file, app_language)?;
let counter = import(meta_data.0, dictionary)?;
In the yarnish example a duration is displayed at the and. We can do that, too,
usually by subtracting two timestamps; one determined at the start of the
program and the other one at the end. But Rust provides a convenience method
elapsed in
std::time::Instant. So
assign the value of Instant::now() to started.
let started = Instant::now();
After that, set the two indicators you the Emojis for before.
println!(
    "{} {}Polishing file...",
    style("[1/2]").bold().dim(),
    BOOKMARK
);

println!(
    "{} {}Importing file...",
    style("[2/2]").bold().dim(),
    MINIDISC
);
Run cargo build and run the importer tool with
cargo run --bin import res/source_file.txt en db. The output should look
somewhat like this.

Showing progress
Time to add the spinner. Add a new function setup_spinner where you create a
ProgressBar
and
style
it. Be sure to check out the documentation for additional settings.
fn setup_spinner() -> ProgressBar {
    let progress_bar = ProgressBar::new_spinner();
    progress_bar.enable_steady_tick(120);
    progress_bar.set_style(ProgressStyle::default_bar()
        .template("{prefix:.bold.dim} {spinner:.green} {msg}"));

    progress_bar
}
This will result in an animated green spinner that can display a message next to it. I’ll leave it up to you again to style it as you please. Usually this kind of stuff is where I waste most of my time.
Go back to main.rs and set up the ProgressBar. Put the function call before
polish and add a
std::thread::sleep
for 5 seconds, or you won’t see anything because of the small source file.
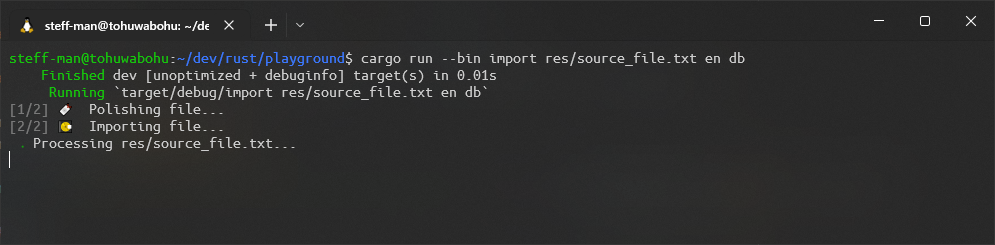
let progress_polish = setup_spinner();
progress_polish.set_message(format!("Processing {}...", &args.source_file));

let meta_data = polish(&args.source_file, app_language)?;

progress_polish.finish_with_message(
    format!("Finished processing {}. Importing...", &args.source_file));
Again, test it with cargo run --bin import res/source_file.txt en db.
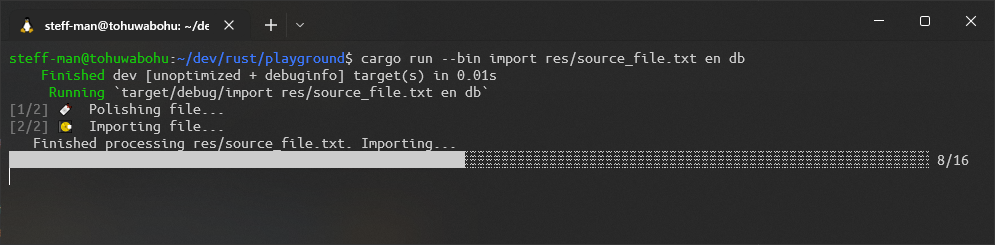
Alright! Ditch the thread now. Because now the total count of the lines to
import is known, import can take a reference &ProgressBar and continuously
call the
inc
method on that. Prepare the function and add a std::thread::sleep for maybe a
second between each line.
fn import(
    tmp_file_name: String,
    dictionary: Box<dyn Dictionary>,
    progress_bar: &ProgressBar
) -> Result<i32, Error> {
    // ...
    for line_result in buf_reader.lines() {
        // ...
        thread::sleep(Duration::from_secs(1));
        progress_bar.inc(1);
    }
    // ...
}
Test it with the usual command.
Of course, don’t forget to wait for the sparkle.

Whoops, seems like we forgot to call diesel migrate redo between the tests,
but that doesn’t matter. Remove the sleep call from the code, and we’re
finished!
Greetings
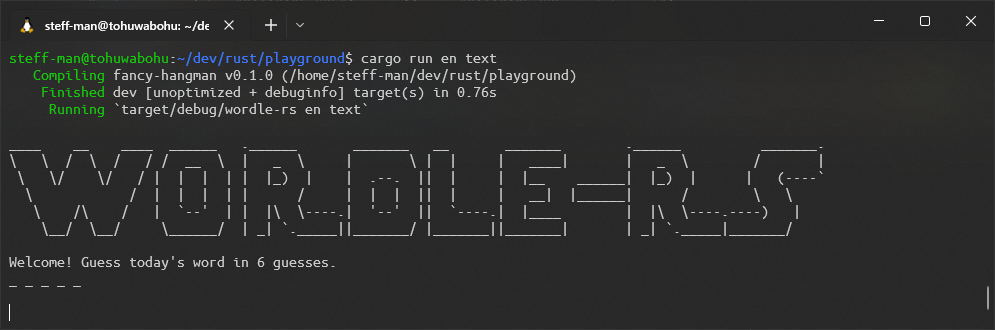
Starting the game looks plain and anticlimactic. If I had not developed it
myself, I wouldn’t know what to do next. The least we can do ist print a welcome
message and a short description. In main.rs, add a new function
print_welcome that does exactly that and call it in the main function after
the arguments have been parsed. It could look like this:
fn main() -> {
    // parse arguments
    // ...
    print_welcome();

    // ...
}


// ...
fn print_welcome() {
    println!(r#"
____    __    ____  ______   .______       _______   __       _______        .______          _______.
\   \  /  \  /   / /  __  \  |   _  \     |       \ |  |     |   ____|       |   _  \        /       |
 \   \/    \/   / |  |  |  | |  |_)  |    |  .--.  ||  |     |  |__    ______|  |_)  |      |   (----`
  \            /  |  |  |  | |      /     |  |  |  ||  |     |   __|  |______|      /        \   \
   \    /\    /   |  `--'  | |  |\  \----.|  '--'  ||  `----.|  |____        |  |\  \----.----)   |
    \__/  \__/     \______/  | _| `._____||_______/ |_______||_______|       | _| `._____|_______/

Welcome! Guess today's word in 6 guesses.
_ _ _ _ _
    "#)
}
A
raw string literal
helps to print some ASCII art in the terminal. It does not process any escapes
and comes in handy when you need to write a multi-line String into the CLI.
Let’s try how it looks.
Finishing the game
When the player correctly guessed the word, it should be marked like the column
guessed suggests. Right now the same entry is loaded every time the player
starts up the game. He should be greeted with the winning message instead and
the game should end.
Add a member named guessed to the DictionaryEntry.
/// Represents a dictionary entry
pub struct  DictionaryEntry {
    pub word: String,
    pub guessed: bool
}
Extend the Dictionary trait by adding a function called
guessed_word(&self, word_entry: DictionaryEntry). For TextDictionary, just
implement the method with an empty body. It does not serve any purpose there. In
DbDictionary, issue an UPDATE statement in the guessed_word
implementation. Because the importer prevents duplicates from being inserted
into the database, we can assume that the word and language combination is
unique.
Your implementation should look like this:
fn guessed_word(&self, word_entry: DictionaryEntry) {
    match diesel::update(dictionary::dsl::dictionary
        .filter(dictionary::word.eq(word_entry.word)))
        .filter(dictionary::language.eq(&self.app_language.to_string()))
        .set(dictionary::guessed.eq(true))
        .execute(&self.conn) {
            Ok(_) => {},
            Err(error) => { println!("Error updating the solution.\n{}", error) }
    }
}
This method is to be invoked when a full match occurs. Open main.rs and add it
after the winning notification.
fn main() -> {
    // ...
    if full_match {
        println!("Congratulations! You won!");
        dictionary.guessed_word(solution);
    }
    // ...
}
Back to DbDictionary, the method get_word_of_today matches on the guessed
column and looks for an alternative in the database. Remove the line with
guessed.eq(false). By doing so, the already guessed word will always be
returned when starting the game on the same day, and we can handle it further in
the game logic.
fn get_word_of_today(
    &self,
    current_day: NaiveDate
) -> Result<Option<DbDictionaryEntry>, Error> {
    match dictionary::dsl::dictionary
        .filter(dictionary::used_at.eq(current_day))
        .filter(dictionary::language.eq(&self.app_language.to_string()))
        .limit(1)
        .get_result::<DbDictionaryEntry>(&self.conn)
        .optional() {
            // ...
        }
    }
}
In find_word, make sure to set the guessed flag at the DictionaryEntry
creation.
Some(entry) => Some(DictionaryEntry {
    word: entry.word,
    guessed: entry.guessed
}),
For all other occurrences, this value should be hardcoded to false. Especially
in TextDictionary where we can’t evaluate that flag because of missing
information and in import.rs when calling create_word.
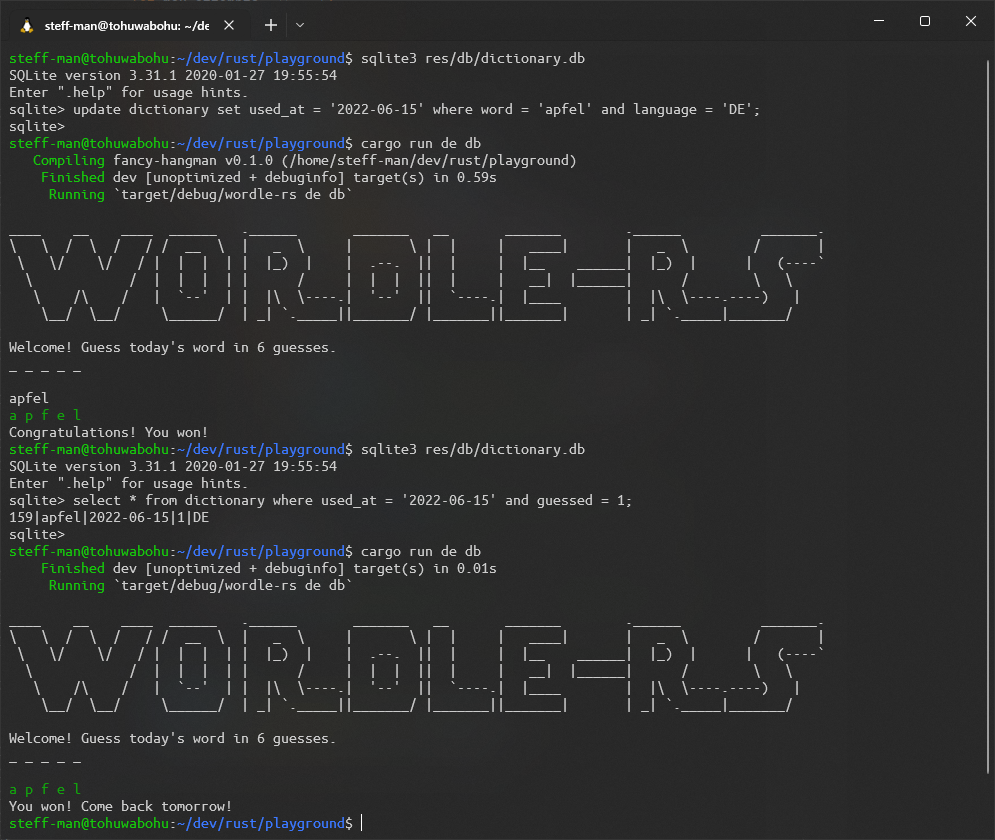
Back to main.rs, right after get_random_word returned the word of the day,
assure it has not been guessed. Otherwise, deliver the player your dearest
congratulations. Use the check_word function to render the word in a green
color, just as if the player just inserted the word.
match solution_option {
    None => println!("Maybe the dictionary is empty?"),
    Some(solution) => {

        if solution.guessed {
            check_word(&solution.word, &solution.word);

            println!("You won! Come back tomorrow!");
        } else {
            let max_attempts = 6;
            // ...
        }
    }
}
Prepare a test data set, run cargo build, start the game and test it. I’ll use
a German word I imported just before with the new pretty progress bars.
Wrapping it up
I’m so glad everything came together in the end. It’s a deep satisfaction if you
work on something over a few weeks and finally see the finished product. There
are a few things that could be added, for example additional cli arguments that
reset the Dictionary and maybe some more information on how to use the
arguments. But you don’t need me for accomplishing that, I gave you the tools to
expand this project by yourself.
Have fun with this little game, feel free to extend it, expand it, change it to your liking. I hope you enjoyed the journey!
You can find the code at this stage on my github page.
Building a CLI wordle game in Rust: Part 5